服务器
本文最后更新于:2024年6月21日 凌晨
Linux相关命令
基础知识
- Linux系统的文件结构
/bin        二进制文件,系统常规命令
/boot       系统启动分区,系统启动时读取的文件
/dev        设备文件
/etc        大多数配置文件
/home       普通用户的家目录
/lib        32位函数库
/lib64      64位库
/media      手动临时挂载点
/mnt        手动临时挂载点
/opt        第三方软件安装位置
/proc       进程信息及硬件信息
/root       临时设备的默认挂载点
/sbin       系统管理命令
/srv        数据
/var        数据
/sys        内核相关信息
/tmp        临时文件
/usr 用户相关设定- Linux系统命令行的含义
示例:root@app00:~#
root    //用户名,root为超级用户
@       //分隔符
app00   //主机名称
~     //当前所在目录,默认用户目录为~,会随着目录切换而变化,例如:(root@app00:/bin# ,当前位置在bin目录下)
# //表示当前用户是超级用户,普通用户为$,例如:("yao@app00:/root$" ,表示使用用户"yao"访问/root文件夹)- 命令组成
示例:命令 参数名 参数值基础操作
- 重启系统
(1)立刻关机
shutdown -h now 或者 poweroff
(2)两分钟后关机
shutdown -h 2- 关闭系统
(1)立刻重启
shutdown -r now 或者 reboot
(2)两分钟后重启
shutdown -r 2 - 帮助命令(help)
ifconfig --help //查看 ifconfig 命令的用法- 命令说明书(man)
man shutdown //打开命令说明后,可按"q"键退出- 切换用户(su)
su yao               //切换为用户"yao",输入后回车需要输入该用户的密码
exit                 //退出当前用户
目录操作
切换目录(cd)
cd /                 //切换到根目录
cd /bin              //切换到根目录下的bin目录
cd ../               //切换到上一级目录 或者使用命令:cd ..
cd ~                 //切换到home目录
cd -                 //切换到上次访问的目录
cd xx(文件夹名)       //切换到本目录下的名为xx的文件目录,如果目录不存在报错
cd /xxx/xx/x         //可以输入完整的路径,直接切换到目标目录,输入过程中可以使用tab键快速补全
查看目录(ls)
ls                   //查看当前目录下的所有目录和文件
ls -a                //查看当前目录下的所有目录和文件(包括隐藏的文件)
ls -l                //列表查看当前目录下的所有目录和文件(列表查看,显示更多信息),与命令"ll"效果一样
ls /bin              //查看指定目录下的所有目录和文件
创建目录(mkdir)
mkdir tools          //在当前目录下创建一个名为tools的目录
mkdir /bin/tools     //在指定目录下创建一个名为tools的目录
删除目录与文件(rm)
rm tools //删除一个名为tools的目录修改目录(mv)
mv 当前目录名 新目录名        //修改目录名,同样适用与文件操作
mv /usr/tmp/tool /opt       //将/usr/tmp目录下的tool目录剪切到 /opt目录下面
mv -r /usr/tmp/tool /opt    //递归剪切目录中所有文件和文件夹
拷贝目录(cp)
cp /usr/tmp/tool /opt       //将/usr/tmp目录下的tool目录复制到 /opt目录下面
cp -r /usr/tmp/tool /opt    //递归剪复制目录中所有文件和文件夹
搜索目录(find)
find /bin -name 'a*' //查找/bin目录下的所有以a开头的文件或者目录查看当前目录(pwd)
pwd //显示当前位置路径
文件操作
新增文件(touch)
touch a.txt //在当前目录下创建名为a的txt文件(文件不存在),如果文件存在,将文件时间属性修改为当前系统时间删除文件(rm)
rm 文件名              //删除当前目录下的文件
rm -f 文件名           //删除当前目录的的文件(不询问)
编辑文件(vi、vim)
vi 文件名              //打开需要编辑的文件
--进入后,操作界面有三种模式:命令模式(command mode)、插入模式(Insert mode)和底行模式(last line mode)
命令模式
-刚进入文件就是命令模式,通过方向键控制光标位置,
-使用命令"dd"删除当前整行
-使用命令"/字段"进行查找
-按"i"在光标所在字符前开始插入
-按"a"在光标所在字符后开始插入
-按"o"在光标所在行的下面另起一新行插入
-按":"进入底行模式
插入模式
-此时可以对文件内容进行编辑,左下角会显示 "-- 插入 --""
-按"ESC"进入底行模式
底行模式
-退出编辑:      :q
-强制退出:      :q!
-保存并退出:    :wq
## 操作步骤示例 ##
1.保存文件:按"ESC" -> 输入":" -> 输入"wq",回车     //保存并退出编辑
2.取消操作:按"ESC" -> 输入":" -> 输入"q!",回车     //撤销本次修改并退出编辑
## 补充 ##
vim +10 filename.txt                   //打开文件并跳到第10行
vim -R /etc/passwd                     //以只读模式打开文件
查看文件
cat a.txt          //查看文件最后一屏内容
less a.txt         //PgUp向上翻页,PgDn向下翻页,"q"退出查看
more a.txt         //显示百分比,回车查看下一行,空格查看下一页,"q"退出查看
tail -100 a.txt    //查看文件的后100行,"Ctrl+C"退出查看
文件权限
。。。
打包与解压
说明
   .zip、.rar        //windows系统中压缩文件的扩展名
   .tar              //Linux中打包文件的扩展名
   .gz               //Linux中压缩文件的扩展名
   .tar.gz           //Linux中打包并压缩文件的扩展名

2.  打包文件

   ~~~bash
   tar -zcvf 打包压缩后的文件名 要打包的文件
   参数说明:z:调用gzip压缩命令进行压缩; c:打包文件; v:显示运行过程; f:指定文件名;
   示例:
   tar -zcvf a.tar file1 file2,...      //多个文件压缩打包
解压文件
tar -zxvf a.tar                      //解包至当前目录
tar -zxvf a.tar -C /usr------        //指定解压的位置
unzip test.zip             //解压*.zip文件
unzip -l test.zip          //查看*.zip文件的内容
其他常用命令
🏎️🛵🛴🚲🏍️
系统管理
防火墙操作
service iptables status      //查看iptables服务的状态
service iptables start       //开启iptables服务
service iptables stop        //停止iptables服务
service iptables restart     //重启iptables服务
chkconfig iptables off       //关闭iptables服务的开机自启动
chkconfig iptables on        //开启iptables服务的开机自启动
##centos7 防火墙操作
systemctl status firewalld.service     //查看防火墙状态
systemctl stop firewalld.service       //关闭运行的防火墙
systemctl disable firewalld.service    //永久禁止防火墙服务
修改主机名(CentOS 7)
hostnamectl set-hostname 主机名查看网络
ifconfig修改IP
修改网络配置文件,文件地址:/etc/sysconfig/network-scripts/ifcfg-eth0
------------------------------------------------
主要修改以下配置:
TYPE=Ethernet               //网络类型
BOOTPROTO=static            //静态IP
DEVICE=ens00                //网卡名
IPADDR=192.168.1.100        //设置的IP
NETMASK=255.255.255.0       //子网掩码
GATEWAY=192.168.1.1         //网关
DNS1=192.168.1.1            //DNS
DNS2=8.8.8.8                //备用DNS
ONBOOT=yes                  //系统启动时启动此设置
-------------------------------------------------
修改保存以后使用命令重启网卡:service network restart
配置映射
修改文件: vi /etc/hosts
在文件最后添加映射地址,示例如下:
192.168.1.101  node1
192.168.1.102  node2
192.168.1.103  node3
配置好以后保存退出,输入命令:ping node1 ,可见实际 ping 的是 192.168.1.101。
查看进程
ps -ef         //查看所有正在运行的进程
ps -ef | grep xxxx
ps -ef : 查看本机所有的进程;
grep xxxx代表过滤找到条件xxxx的进程
7. 结束进程
kill pid       //杀死该pid的进程
kill -9 pid    //强制杀死该进程
查看链接
ping IP        //查看与此IP地址的连接情况
netstat -an    //查看当前系统端口
netstat -an | grep 8080     //查看指定端口
快速清屏
ctrl+l //清屏,往上翻可以查看历史操作远程主机
ssh IP //远程主机,需要输入用户名和密码
Ubuntu
初始化配置
# 设置root密码
sudo passwd root
# 设定静态IP
sudo nano /etc/netplan/50-cloud-init.yaml
在文件中找到下面这行代码:dhcp4: true
将其替换为以下内容:
dhcp4: false
addresses: [IP地址/子网掩码]
gateway4: 网关地址
nameservers:
  addresses: [DNS服务器地址]

例如:
dhcp4: false
addresses: [192.168.0.100/24]
gateway4: 192.168.0.1
nameservers:
  addresses: [8.8.8.8]
保存并退出,运行以下命令来应用配置并重启网络服务:
sudo netplan apply
sudo systemctl restart networking
远程访问主机
sudo apt update
sudo apt install openssh-server
安装完成后,请确保 OpenSSH 服务器已启动。通过运行以下命令来检查它的状态:
sudo systemctl status ssh如果 OpenSSH 服务器尚未启动,通过运行以下命令来启动它:
sudo systemctl start ssh设定 OpenSSH 服务器随系统启动而自动启动,运行以下命令:
sudo systemctl enable ssh换源
首先,打开终端并运行以下命令来备份源列表文件:
sudo cp /etc/apt/sources.list /etc/apt/sources.list.bak然后,运行以下命令来打开源列表文件:
sudo gedit /etc/apt/sources.list在文件中,删除原来的内容,并粘贴以下内容:
deb http://mirrors.aliyun.com/ubuntu/ focal main restricted universe multiverse
deb-src http://mirrors.aliyun.com/ubuntu/ focal main restricted universe multiverse

deb http://mirrors.aliyun.com/ubuntu/ focal-security main restricted universe multiverse
deb-src http://mirrors.aliyun.com/ubuntu/ focal-security main restricted universe multiverse

deb http://mirrors.aliyun.com/ubuntu/ focal-updates main restricted universe multiverse
deb-src http://mirrors.aliyun.com/ubuntu/ focal-updates main restricted universe multiverse

deb http://mirrors.aliyun.com/ubuntu/ focal-proposed main restricted universe multiverse
deb-src http://mirrors.aliyun.com/ubuntu/ focal-proposed main restricted universe multiverse

deb http://mirrors.aliyun.com/ubuntu/ focal-backports main restricted universe multiverse
deb-src http://mirrors.aliyun.com/ubuntu/ focal-backports main restricted universe multiverse
保存文件并退出。
最后,运行以下命令来更新源列表:
sudo apt update也可以通过运行以下命令来恢复备份的源列表文件:
sudo mv /etc/apt/sources.list.bak /etc/apt/sources.list
sudo apt update
设置主机名称
默认主机的 hostname 都是随机生成,不方便识别,这里以 ubuntu-study 为实例作为主机名进行设置。
sudo hostnamectl set-hostname ubuntu-study # 设置主机名
sudo hostnamectl # 查看主机名
设置完成之后,需要退出终端重新登录就可以看到自定义主机名。
终端配色终端配色
为了设置终端颜色,需要对 ~/.bashrc 文件中的 PS1 变量进行定制,值得注意的是这个修改仅对当前用户生效。
echo "# 终端配色
export export PS1='\[\033[01;33m\]\u@\h\[\033[01;31m\] \W\$\[\033[00m\] '" >> ~/.bashrc

source ~/.bashrc
配置完成后,终端配色如下

添加必要系统工具
安装 vim 编辑器、网络请求 wget、curl以及压缩与解压缩软件等。
sudo apt-get install -y \
  vim \
  wget \
  curl \
  cmake \
  g++ \
  tree \
  git \
  zip \
  unzip
设置时区
将服务器的时区设置为中国地区。
sudo timedatectl set-timezone Asia/Shanghai
sudo timedatectl set-local-rtc 0
sudo timedatectl set-ntp 1
配置默认的编辑器
Ubuntu 系统默认的文件编辑器是 nano 而不是 Vim,那么怎么设置成 Vim 呢?
执行下面的命令选择将 Vim 设置为服务器默认的编辑器。
sudo update-alternatives --config editor常用工具
vm-tools
当使用vm虚拟机使用ubuntu时,需要安装vm-tools
# vm的工具
sudo apt -y install open-vm-tools
# 安装下面的,可以让我们在主机与虚拟机之间复制粘贴
sudo apt -y install open-vm-tools-desktop
软件中心
sudo apt install plasma-discover安装与卸载.deb文件
安装
使用默认的软件中心
在命令行中使用
dpkg安装.deb文件# 如果你想对 deb 文件使用 apt 命令,像这样使用它: sudo apt install path_to_deb_file # 如果你想对将要安装的 deb 软件包使用 dpkg 命令: sudo dpkg -i path_to_deb_file # 如果你在安装 deb 软件包的过程中得到一个依赖项的错误,你可以使用下面的命令来修复依赖项的问题: sudo apt install -f
卸载
使用apt命令移除deb软件包
sudo apt remove program_name
# 如果不知道安装程序的`program_name`
sudo apt list --installed | grep xxx
使用dpkg命令移除deb软件包
# 你可以使用 dpkg 来找到已安装程序的名称:
dpkg -l | grep edge
ii microsoft-edge-stable 116.0.1938.81-1 amd64 The web browser from Microsoft在上面的命令输出中的 ii 意味着软件包已经被正确地安装。现在,你有了程序名称,你可以使用 dpkg 命令来移除它:
dpkg -r program_name
Windows
与Linux传输文件
使用scp命令
scp C://Windows文件.txt [email protected]:/home/Linux文件位置项目构建
java项目
达成jar包
mvn clean package运行jar包
java -jar demoa.jar后台运行
nohup java -jar demo.jar >temp.txt &可通过jobs查看后台任务
Vue项目
vue3使用Router的history模式,nginx其他页面报错:
location / {
    index  /data/dist/index.html;
    try_files $uri $uri/ /index.html;
  }
若依框架实战
RuoYi-Vue: 🎉前后端分离权限管理系统(gitee.com)
搭建好Mysql、redis,将文件中的SQL导入数据据,在application.yml中配置好数据据ip地址
将后端打包为jar包:
mvn clean package或者使用IDEA的Maven

打包成功后,将jar包复制到服务器,使用:
java -jar ruoyi-vue.jar前端使用生成模式打包
npm run build:prod将打包后的dist放到服务器
nginx配置
在ngiex进行配置修改:
server
    {
        listen 80;
        server_name ry-vue;
        index index.html index.htm index.php;
        root /workspace/ui/dist;

		location /prod-api/ {
            proxy_set_header Host $http_host;
            proxy_set_header X-Real-IP $remote_addr;
            proxy_set_header REMOTE-HOST $remote_addr;
            proxy_set_header X-Forwarded-For $proxy_add_x_forwarded_for;
            proxy_pass http://ip:8080/;
        }
    }
./nginx -s -reload #重启nginx- 配置nginx让他负载均衡转发
upstream ruoyi{
    server 192.168.109.102:8080 weight=5; #weight为权重,权重越高,请求的服务更多
    server 192.168.109.103:8080 weight=3;
}


server {
    listen       80;
    server_name  localhost;

    #charset koi8-r;

    #access_log  logs/host.access.log  main;

    location / {
        root   /workspace/dist;
        index  index.html index.htm;
    }

    location /prod-api/ {
        proxy_set_header Host $http_host;
        proxy_set_header X-Real-IP $remote_addr;
        proxy_set_header REMOTE-HOST $remote_addr;
        proxy_set_header X-Forwarded-For $proxy_add_x_forwarded_for;
        proxy_pass http://ruoyi/;

    }
- 静态资源404
在nginx配置后端接口,加上^~
location ^~ /api/ {
	proxy_pass http://localhost:9090/api/;
}
在Windows中安装nginx
从官网进行下载:nginx,下载后放到一个没有空格,没有中文的目录下:

在此处,进入cmd:输入命令 nginx.exe,即可启动,如果没有报错,及启动正常,
关闭nginx,关闭当前的命令行窗口,nginx不会停止,关闭有两种方式:
- 在
cmd中输入:nginx.exe -s stop即可关闭 - 在任务管理器中进行关闭:

服务器配置代理
需要准备3个文件:
先下载对应版本的clash clash-linux-amd64-v1.17.0.gz
在windows中打开clash,打开配置文件所在的文件夹,将配置文件复制出来改名为
config.yml


- 在上一级目录中,复制
Country.mmdb

将准备好的三个文件放到新建文件夹clash中,上传到服务器 /opt中,进入/opt/clash

# 解压文件
gunzip clash-linux-amd64-v1.17.0.gz
# 重命名为clash 赋予权限
mv clash-linux-amd64-v1.17.0 clash
chmod +x clash
执行 ./clash --help 进行测试,如果执行失败,说明下载错了版本,需重新下载对应版本
./clash --help
将clash设为守护进程
键入
cd /etc/systemd/system
然后vim clash.service文件内容如下,直接复制粘贴即可(按i进入插入模式,然后shift+Insert粘贴),然后退出保存(ESC +:wq)
[Unit]
Description=clash-core
[Service]
Type=simple
ExecStart=/opt/clash/clash -f /opt/clash/config.yml -d /opt/clash/
[Install]
WantedBy=multi-user.target
在终端中启用clash
#可将下面两行放入~/.bashrc中,否则仅对当次终端有效。
针对当前用户
vim ~/.bashrc
针对所有用户
vim /etc/profile
export http_proxy="http://127.0.0.1:7890"
export https_proxy="http://127.0.0.1:7890"

修改后可以使用命令使其立即生效
source ~/.bashrc
#可将下面两行放入~/.bashrc中,否则仅对当次终端有效。
export http_proxy="http://127.0.0.1:7890"
export https_proxy="http://127.0.0.1:7890"
#查看环境变量
export
#启动clash
systemctl daemon-reload
systemctl start clash
#把clash设为开机自启
systemctl enable clash.service
#检查是否开机自启
systemctl is-enabled clash.service测试
curl -i google.com关闭clash
#终止clash服务
systemctl stop clash

#关闭开机自启
systemctl disable clash

#删除设置的环境变量
unset http_proxy
unset https_proxy
搭建VsCode Web
安装code-server,可以从GitHub网址进行选择https://github.com/coder/code-server,如果是linux, amd的可以直接点击下面的链接进行下载:code-server-4.16.1-linux-amd64.tar.gz
在服务器宝塔安装Node.js版本管理器
将下载的压缩包复制到路径/www/wwwroot/下,重名为code_server,添加node项目,启动选择的命令选择自定义
/www/wwwroot/code_server/bin/code-server --port 9999 --host 0.0.0.0 --auth password
Jupyter
安装 Anaconda
下载Anaconda最新安装程序 https://www.anaconda.com/products/i
wget https://repo.anaconda.com/archive/Anaconda3-2021.05-Linux-x86_64.sh运行安装程序:
sh Anaconda3-2021.05-Linux-x86_64.sh安装过程中敲回车和输入yes同意许可即可
安装完成重新登录即可
搭建环境
- 安装jupyter包
conda install jupyter - 生成默认配置文件
jupyter notebook --generate-config --allow-root- 随后我们往配置文件写入一些内容
# 设置可以访问的ip, 默认是localhost, 将其改为 '*'
c.NotebookApp.ip = '*'

# 笔记本的默认打开目录, 自己设置
c.NotebookApp.notebook_dir = '/home/jupyter/documents/jupyter_notebook'

# 笔记本启动后是否打开浏览器, 设为 False即可
c.NotebookApp.open_browser = False

# 默认访问端口, 可自己修改
c.NotebookApp.port = 9999

# jupyterlab是否显示quit按钮,我设为false以免自己不小心按到把服务停了
c.NotebookApp.quit_button = true

# 如果使用root用户运行,将下列值改为True即可, 运行时也可加参数将其改为True
c.NotebookApp.allow_root = False- 设置密码
jupyter notebook password- 修改好配置文件之后, 运行如下命令启动笔记本
jupyter notebook后台运行
nohup jupyter notebook --no-browser --ip=0.0.0.0 --allow-root &用&让命令后台运行, 并把标准输出写入jupyter.log中
nohup表示no hang up, 就是不挂起, 这个命令执行后即使终端退出, Jupyter也不会停止运行.
关闭后台运行的Jupyter
- 找到Jupyter进程PID(关闭在前面后台执行的进程的步骤,首先找到其进程PID)
ps -ef | grep xxxxps -ef : 查看本机所有的进程;
grep xxxx代表过滤找到条件xxxx的进程
- kill掉Jupyter进程
kill -9 PIDkill -9 具体的进程的PID
Minio对象存储搭建
可以通过直接在Linux安装,或者通过Docker安装(推荐)
在docker中安装
拉去minio镜像
docker pull minio/minio运行mino,将网页控制台与Api接口的端口的9000,9001映射出来,其中的MINIO_ACCESS_KEY与MINIO_SECRET_KEY为网页登录的用户名与密码。将主机的 /home/data 目录映射到容器的 /data 目录,存储的文件保存到本机的/home/data中,主机的 /home/config 目录映射到容器的 /root/.minio 目录。
docker run -p 9000:9000 -p 9001:9001 --name minio -d --restart=always -e "MINIO_ACCESS_KEY=admin" -e "MINIO_SECRET_KEY=admin123" -v /home/data:/data -v /home/config:/root/.minio minio/minio server --console-address ":9000" --address ":9001" /data启动:ip:9000,进入控制台Web,输入刚才设置的用户名与密码
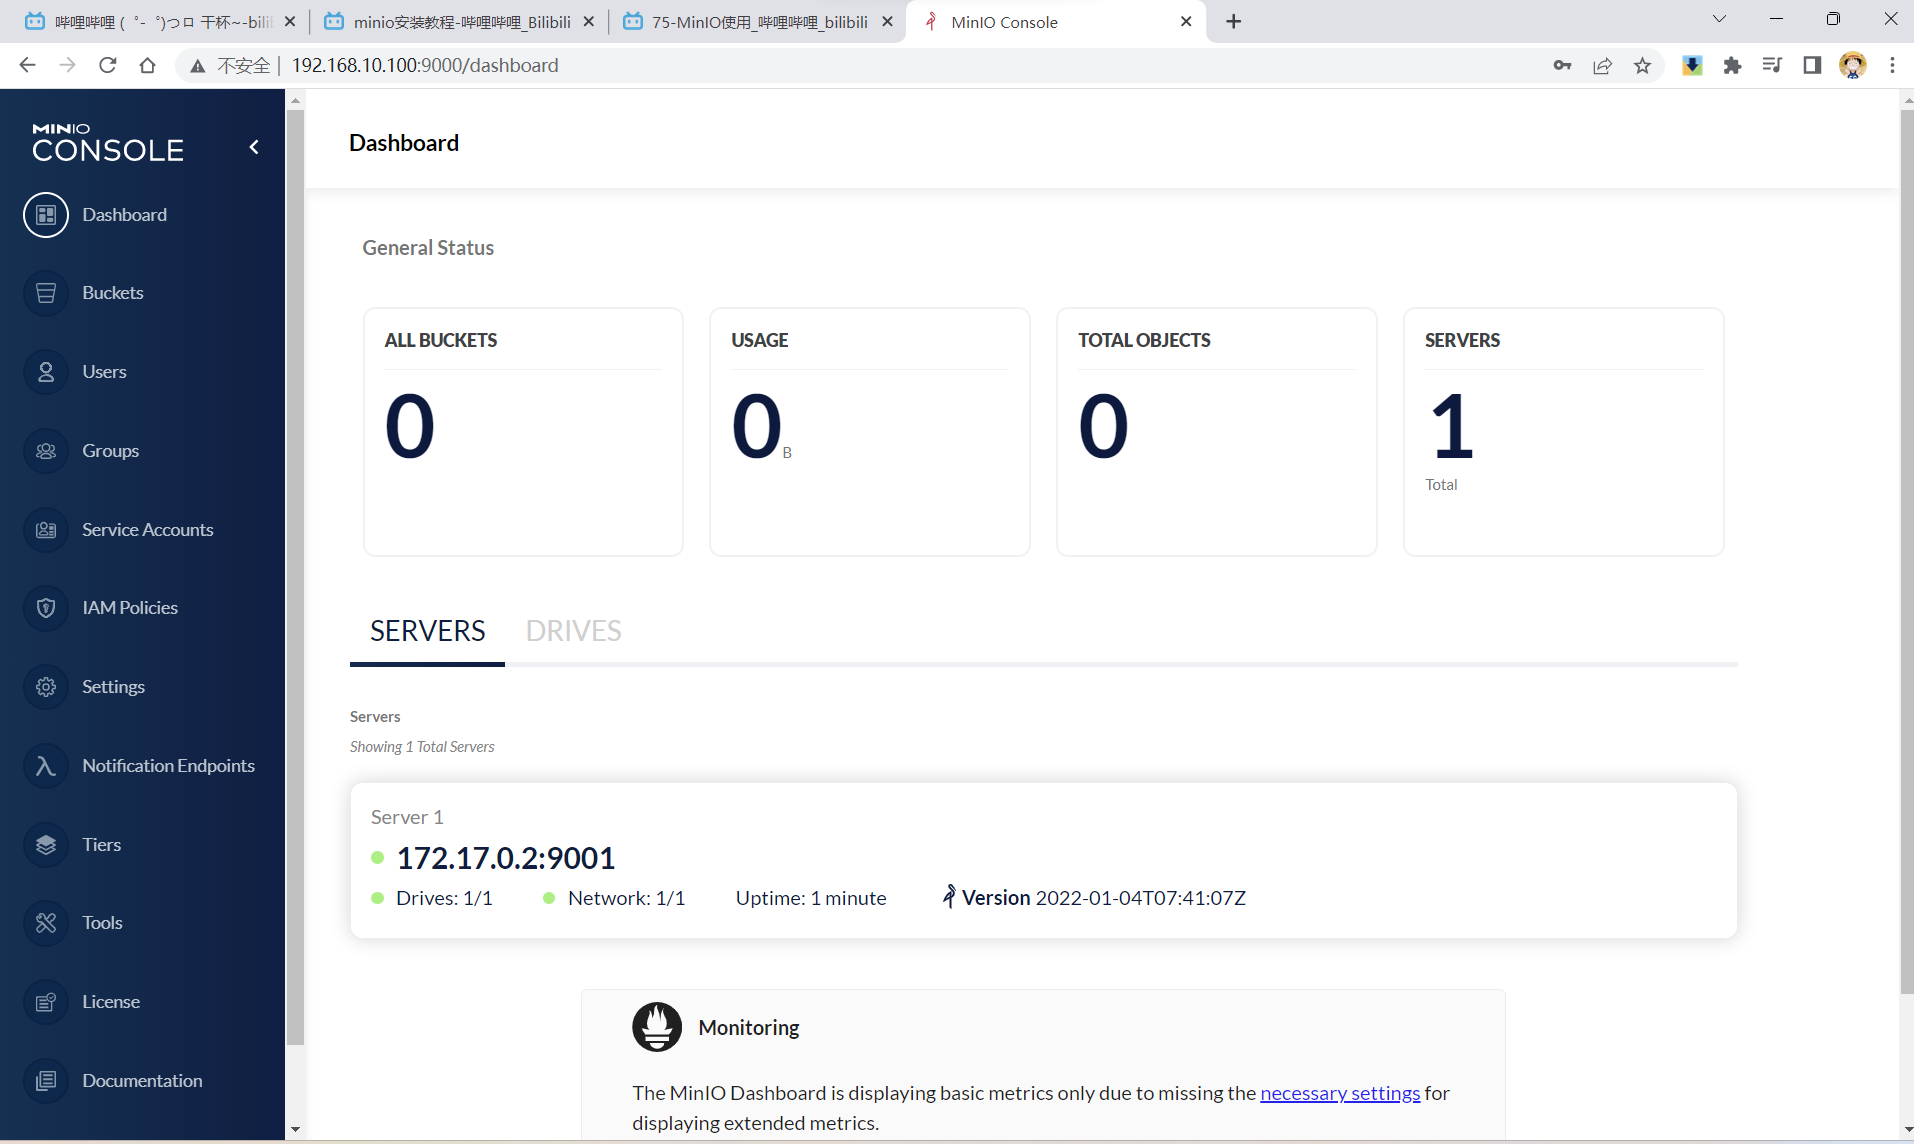
创建新的密钥,也就是创建一个用户,分配为管理员,方便下面进行读写:

在SpringBoot中使用
配置依赖
<!-- minio -->
<dependency>
    <groupId>io.minio</groupId>
    <artifactId>minio</artifactId>
    <version>8.3.7</version>
</dependency>
在application.yml中配置
minio:
  # 访问的url
  endpoint: http://192.168.10.100
  # API的端口
  port: 9001
  # 密钥
  accessKey:
  secretKey:
  secure: false
  bucket-name: picture # 桶名
  image-size: 10455760    # 图片文件最大为10M
  file-size: 1073741824   # 文件最大为1G
需在包config下新建类
import io.minio.MinioClient;
import lombok.Data;
import org.springframework.boot.context.properties.ConfigurationProperties;
import org.springframework.context.annotation.Bean;
import org.springframework.context.annotation.Configuration;

/**
 * @version: java version 1.8
 * @Author: WWJ
 * @description:
 * @date: 2023-02-21 22:20
 */
@Data
@Configuration
@ConfigurationProperties(prefix = "minio")
public class MyMinioProperties {
    private String endpoint;
    private Integer port;
    private String accessKey;
    private String secretKey;
    private boolean secure;
    private String bucketName;
    private long imageSize;
    private long fileSize;

    @Bean
    public MinioClient minioClient() {
        MinioClient minioClient = MinioClient.builder()
                .credentials(accessKey, secretKey)
                .endpoint(endpoint, port, secure)
                .build();
        return minioClient;
    }
}
使用文件处理的工具类
package com.rongmei.mushroomProject.utils;
import com.rongmei.mushroomProject.config.MyMinioProperties;
import io.minio.*;
import io.minio.errors.ErrorResponseException;
import io.minio.errors.InsufficientDataException;
import io.minio.errors.InvalidResponseException;
import io.minio.errors.XmlParserException;
import io.minio.http.Method;
import io.minio.messages.Bucket;
import io.minio.messages.Item;
import org.apache.commons.io.FilenameUtils;
import org.springframework.stereotype.Component;
import org.springframework.util.FastByteArrayOutputStream;
import org.springframework.web.multipart.MultipartFile;
import javax.annotation.Resource;
import javax.servlet.ServletOutputStream;
import javax.servlet.http.HttpServletResponse;
import java.io.IOException;
import java.security.NoSuchAlgorithmException;
import java.util.ArrayList;
import java.util.List;
import java.util.UUID;
/**
* @version: java version 1.8
* @Author: WWJ
* @description:
* @date: 2023-02-21 22:33
*/
@Component
public class MinioUtil {
@Resource
private MyMinioProperties prop;
@Resource
private MinioClient minioClient;
/**
* 查看存储bucket是否存在
*
* @return boolean
*/
public Boolean bucketExists(String bucketName) {
Boolean found;
try {
found = minioClient.bucketExists(BucketExistsArgs.builder().bucket(bucketName).build());
} catch (Exception e) {
e.printStackTrace();
return false;
}
return found;
}
/**
* 创建存储bucket
*
* @return Boolean
*/
public Boolean makeBucket(String bucketName) {
try {
minioClient.makeBucket(MakeBucketArgs.builder()
.bucket(bucketName)
.build());
} catch (Exception e) {
e.printStackTrace();
return false;
}
return true;
}
/**
* 删除存储bucket
*
* @return Boolean
*/
public Boolean removeBucket(String bucketName) {
try {
minioClient.removeBucket(RemoveBucketArgs.builder()
.bucket(bucketName)
.build());
} catch (Exception e) {
e.printStackTrace();
return false;
}
return true;
}
/**
* 获取全部bucket
*/
public List<Bucket> getAllBuckets() {
try {
List<Bucket> buckets = minioClient.listBuckets();
return buckets;
} catch (Exception e) {
e.printStackTrace();
}
return null;
}
/**
* 文件上传
*
* @param file 文件
* @return Boolean
*/
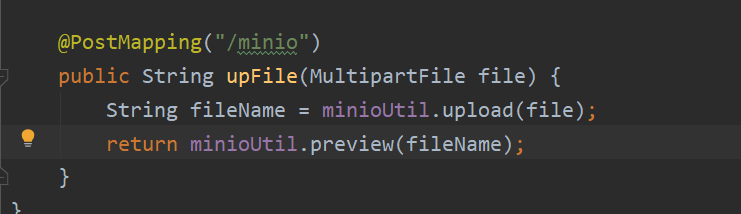
public String upload(MultipartFile file) {
if (file.isEmpty()) {
throw new RuntimeException();
}
String originalFilename = file.getOriginalFilename();
String uuid = UUID.randomUUID().toString().replace("-", "");
String ext = "." + FilenameUtils.getExtension(originalFilename);
String fileName = uuid + ext;
try {
PutObjectArgs objectArgs = PutObjectArgs.builder().bucket(prop.getBucketName()).object(fileName)
.stream(file.getInputStream(), file.getSize(), -1).contentType(file.getContentType()).build();
//文件名称相同会覆盖
minioClient.putObject(objectArgs);
} catch (Exception e) {
e.printStackTrace();
return null;
}
return fileName;
}
/**
* 预览图片
*
* @param fileName
* @return
*/
public String preview(String fileName) {
// 查看文件地址
GetPresignedObjectUrlArgs build = new GetPresignedObjectUrlArgs().builder().bucket(prop.getBucketName()).object(fileName).method(Method.GET).build();
try {
String url = minioClient.getPresignedObjectUrl(build);
return url;
} catch (Exception e) {
e.printStackTrace();
}
return null;
}
/**
* 文件下载
*
* @param fileName 文件名称
* @param res response
* @return Boolean
*/
public void download(String fileName, HttpServletResponse res) {
GetObjectArgs objectArgs = GetObjectArgs.builder().bucket(prop.getBucketName())
.object(fileName).build();
try (GetObjectResponse response = minioClient.getObject(objectArgs)) {
byte[] buf = new byte[1024];
int len;
try (FastByteArrayOutputStream os = new FastByteArrayOutputStream()) {
while ((len = response.read(buf)) != -1) {
os.write(buf, 0, len);
}
os.flush();
byte[] bytes = os.toByteArray();
res.setCharacterEncoding("utf-8");
// 设置强制下载不打开
// res.setContentType("application/force-download");
res.addHeader("Content-Disposition", "attachment;fileName=" + fileName);
try (ServletOutputStream stream = res.getOutputStream()) {
stream.write(bytes);
stream.flush();
}
}
} catch (Exception e) {
e.printStackTrace();
}
}
/**
* 查看文件对象
*
* @return 存储bucket内文件对象信息
*/
public List<Item> listObjects() {
Iterable<Result<Item>> results = minioClient.listObjects(
ListObjectsArgs.builder().bucket(prop.getBucketName()).build());
List<Item> items = new ArrayList<>();
try {
for (Result<Item> result : results) {
items.add(result.get());
}
} catch (Exception e) {
e.printStackTrace();
return null;
}
return items;
}
/**
* 获取路径下文件列表
*
* @param prefix 文件名称
* @param recursive 是否递归查找,如果是false,就模拟文件夹结构查找
* @return 二进制流
*/
public Iterable<Result<Item>> listObjects(String prefix, boolean recursive) {
return minioClient.listObjects(ListObjectsArgs.builder().bucket(prop.getBucketName()).prefix(prefix).recursive(recursive).build());
}
/**
* 删除
*
* @param fileName
* @return
* @throws Exception
*/
public boolean remove(String fileName) {
try {
minioClient.removeObject(RemoveObjectArgs.builder().bucket(prop.getBucketName()).object(fileName).build());
} catch (Exception e) {
return false;
}
return true;
}
}在controller层即可调用工具类
上传对象
// 获取桶内所有图片URL
    @GetMapping("/find")
    public List<ObjectDTO> findAll(@RequestParam(defaultValue = "") String filename) throws IOException, InvalidKeyException, InvalidResponseException, InsufficientDataException, NoSuchAlgorithmException, ServerException, InternalException, XmlParserException, ErrorResponseException {
        ArrayList<ObjectDTO> objectDTOS = new ArrayList<>();
        Iterable<Result<Item>> results = minioUtil.listObjects(filename, true);
        for (Result<Item> result: results) {
            String fileName = result.get().objectName();
            String address = minioUtil.preview(fileName);
            String url = StringUtils.substringBefore(address, "?");
            ObjectDTO objectDTO = new ObjectDTO(fileName, url);
            objectDTOS.add(objectDTO);
        }
        return objectDTOS;
    }